• SEARCH BOX

Combine Jetty and Spring Application Context

Spring's Logo The goal of this post is to use one xml configuration file which is Spring's applicationContext.xml and load it only once for the duration of the application running in an embedded jetty server. Read more...

Tutorial on Android Layout

A thumbnail of adroid. Android is an open source platform for mobile devices. Not a hardware. It is a software stack as defined by Google. Encase your not familiar with the term, software stack is compose of an Operating System(OS), middle-ware and the key applications. Read more...

Hi, my name's Paul Labis.

I'm a developer in Makati City, Philippines. Focused on building online Java/J2EE based applications. I'm interested in freelance or part-time work from home.

Saturday, April 24, 2010

Asus PL30JT Technology Business Notebook

Asus showed a notebook of new businesses, PL30JT at CeBIT 2010, which comes with a stylish design. The new Asus notebook includes Turbo33 technology company claims to improve performance by 33%.

Asus PL30JT Business Notebook

The PL30JT is fueled by Intel Core i5 processor and up to 4 GB of RAM. It is equipped with two graphics cards, the 1GB NVIDIA GeForce 310M dedicated graphics and integrated Intel GMA HD technology with Optimus. The professional notebook comes with a 13.3-inch 1366 × 768 LCD display and support for WiFi. It weighs only 1.7 kilograms, with an 8-cell battery. [via itechnews]

This post Asus PL30JT Technology Business Notebook brough to by Netbook Review. Visit Electronics Review for information about gadget and technology

Friday, April 23, 2010

Lenovo IdeaPad Y460 and Y560 Notebooks

Lenovo has not forgotten the home users usually at CES 2010, the company unveiled two new models, the Lenovo IdeaPad Y460 and Y560 notebooks, with options on the latest processors Core i3, i5 and i7 Intel. The IdeaPad Y460 has a 14-inch 1366 x 768, Core i3 or i5 processor, ATI Radeon HD5740/HD5650 and up to 320 GB hard drive, while the IdeaPad Y560 has a 15.6 screen inch Core i3, i5 and i7 CPU, ATI Radeon HD5730 graphics and up to 500 GB hard drive.

Lenovo IdeaPad Y460 and Y560 Notebooks

Both machines have up to 8 GB of RAM, Combo drive blu-ray/dvd and standard WiFi b / g / n. There are also optional Bluetooth, 3G and WiMAX. Include three USB 2.0 ports, a / eSATA combo USB, ExpressCard slot and HDMI, with Ethernet, audio in / out and a memory card reader multiformat. [via slashgear]

This post Lenovo IdeaPad Y460 and Y560 Notebooks brough to by Netbook Review. Visit Electronics Review for information about gadget and technology

Lenovo IdeaPad G460 and G560 Switchable Graphics Notebooks

The IdeaPad G460 has a 14-inch LED screen with backlight, while the G560 gets a screen of 15.6 inches. They have up to 500 GB of hard disk storage. They start at $ 699.99.

Lenovo IdeaPad G460 and G560 Notebooks


Lenovo also announced the V360 IdeaPad 13.3-inch IdeaPad V460 14-inch laptops SOHO market. They have Switchable Graphics and are powered by 2010 Intel Core processors. Both models starting at $ 749.99.

Lenovo is adding the new IdeaPad G460 and G560 notebook, along with Y560 and Y460. The new IdeaPad is improved by a new Intel Core processor with Intel Turbo Boost, HD integrated graphics and up to 8GB of DDR3 memory. [via itechnews]

This post Lenovo IdeaPad G460 and G560 Switchable Graphics Notebooks brough to by Netbook Review. Visit Electronics Review for information about gadget and technology

ASUS Eee PC 1005P Minimalist Netbook


Recently, detailed specifications and pictures of 1005P ASUS Eee PC showed on SlashGear, the netbook has a minimalist design with a pretty decent hardware spec.

ASUS Eee PC 1005P Notebook

This netbook features a 10.1-inch screen supports a resolution of 1024 × 600, it also features an Intel Atom N450 (1.66GHz) processor, 1 GB of RAM and Intel GMA 3150 graphics. You can choose between a 160 GB hard drive 250GB and the netbook has WiFi b / g standard, the more impressive as it offers up to 12 hours of battery life.

The Eee PC 1005P is currently available in the UK for £ 242.95, while the 250GB model (1005PE) is the sale of £ 270.34, these prices equivalent to approximately $ 395 and $ 439 respectively. [via product-reviews]

This post ASUS Eee PC 1005P Minimalist Netbook brough to by Netbook Review. Visit Electronics Review for information about gadget and technology

ASUS Eee PC 1001P Netbook

Plus in Germany, the ASUS Eee PC 1001P has been made available for pre-order costing € 249 which is the equivalent of about $ 357 USD.

ASUS Eee PC 1001P Notebook

The netbook runs Windows XP rather than Windows 7, which we would have expected. It also has a smaller capacity battery than other standard models that will probably limit their use to less than 10 hours. What it does come with a new Intel Atom N450 processor to be launched January 6, which is also the official launch of the Eee Netbook 1001P.
Other features of the netbook include wireless 802.11b / g speeds, 3 x USB 2.0 ports and a 0.3 megapixel webcam. Memory wise it has 1 GB hard disk has a capacity of 160GB. The screen measures 10.1 inches is expected throughout Netbook Eee 1000 series. [via itechnews]

This post ASUS Eee PC 1001P Netbook brough to by Netbook Review. Visit Electronics Review for information about gadget and technology

Dell Vostro 3000 Slim Lightweight Notebook


Following the V13 Vostro, Dell offers the new Vostro 3000 series, a range of new laptops thin, lightweight and robust design for small businesses. Spurred by the latest Intel Core Series, Vostro 3000 is up to 6 GB of memory.
 
Dell Vostro 3000 Slim Lightweight Notebooks

New Dell Vostro 3000 series includes the 13.3-inch Vostro 3300 which is one of the thinnest commercial 13-inch laptop with integrated optical drive, the 14-inch Vostro 3400 with up to 8 hours of autonomy, and the 17 inch Vostro 3700 with an optional Core i7 quad core processors.
The Vostro 3500 and 3700 models come with LED backlight and it can be equipped with up to 1GB NVIDIA GeForce dedicated. The new Vostro laptops support Bluetooth, WiFi and mobile broadband WWAN optional. These new phones will be released March 16. [via itechnews]
This post Dell Vostro 3000 Slim Lightweight Notebook brough to by Netbook Review. Visit Electronics Review for information about gadget and technology

Tuesday, April 20, 2010

Add Related Posts Widget to Blogger or Blogspot


It be better to display related or similar articles below your articles or posts on your blog. This way your readers would easily know that there are related articles you written and they can further read.

The steps to adding related posts widget is easy. It would take less than 3 minutes add it on your blog.

Before starting, make sure to download the related post JavaScript file or ccopy and paste its content to your desired file.js. Then make sure to upload it online where it will be available for import on your template. I recommend you to upload it on Weebly.com, SigMirror.com or HotLinkFiles.com to get a DIRECT LINK to that file.


Step 1: Most important of all, backup your template incase something go wrong or messed up. Goto www.blogspot.com "Layout" portion, then go to "Edit HTML" section. Download present template and make sure to secure the copy on your file storage device.

Step 2: Click on "Expand widget templates" and look for this code:
</head>
and on top of it insert the following code:
<!--RelatedPostsStarts-->
<style>
#related-posts {
float : left;
width : 540px;
margin-top:20px;
margin-left : 5px;
margin-bottom:20px;
font : 11px Verdana;
margin-bottom:10px;
}
#related-posts .widget {
list-style-type : none;
margin : 5px 0 5px 0;
padding : 0;
}
#related-posts .widget h2, #related-posts h2 {
color : #940f04;
font-size : 20px;
font-weight : normal;
margin : 5px 7px 0;
padding : 0 0 5px;
}
#related-posts a {
color : #054474;
font-size : 11px;
text-decoration : none;
}
#related-posts a:hover {
color : #054474;
text-decoration : none;
}
#related-posts ul {
border : medium none;
margin : 10px;
padding : 0;
}
#related-posts ul li {
display : block;
margin : 0;
padding-top : 0;
padding-right : 0;
padding-bottom : 1px;
padding-left : 16px;
margin-bottom : 5px;
line-height : 2em;
border-bottom:1px dotted #cccccc;
}

</style>
<script src='http://www.weebly.com/..../relatedposts_forblogger.js' type='text/javascript'/>
<!--RelatedPostsStops-->

Replace the red link above with your own direct link.

Step 3: Look for the code:
<data:post.body/>
Under it, insert the following code:
<!--RELATED-POSTS-STARTS--><b:if cond='data:blog.pageType == &quot;item&quot;'>
<div id='related-posts'>
<font face='Arial' size='3'><b>Related Posts: </b></font><font color='#FFFFFF'><b:loop values='data:post.labels' var='label'><data:label.name/><b:if cond='data:label.isLast != &quot;true&quot;'>,</b:if><b:if cond='data:blog.pageType == &quot;item&quot;'>
<script expr:src='&quot;/feeds/posts/default/-/&quot; + data:label.name + &quot;?alt=json-in-script&amp;callback=related_results_labels&amp;max-results=5&quot;' type='text/javascript'/></b:if></b:loop> </font>
<script type='text/javascript'> removeRelatedDuplicates(); printRelatedLabels();
</script></div></b:if><!--RELATED-POSTS-STOPS-->

To limit the maximum number of related or similar articles to display under the post, just change max-results=xx by the number you like.

Finally, save your template and test. Related Posts widget should be located under your article or post. Do remember to add categories or labels before you publish your post. Otherwise, no related post will be displayed. 

Hope this tutorial helps.

Friday, April 16, 2010

Tutorial on Android Views - Part 2

In this article, we will be dealing with another types of Android views. They are the RadioGroup, RadioButton, ProgressBar and AutoCompleteTextView. By learning the following views, it will broaden your understanding on android views that will help you build your own android application. 

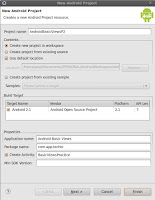
Lets start by creating a new android project on eclipse. See the screenshot beside for android project specifics. 
 
RadioGroup and RadioButton
This two views is basically used to let users choose something among available options. RadioButton has two available states. It is either checked or unchecked.  Once a RadioButton is checked, it cannot be unchecked unless its grouped along with other radio button on a RadioGroup. A RadioGroup is a type of view that is used to group one or mmore radio buttons, thereby allows a user to select only one radiobutton or only one option.

Create new android xml named basicviewspart2.xml under res/layout folder then put the following code:
<?xml version="1.0" encoding="utf-8"?>
<LinearLayout
xmlns:android="http://schemas.android.com/apk/res/android"
android:layout_width="wrap_content"
android:layout_height="wrap_content">

<RadioGroup android:id="@+id/colorOptions"
android:layout_width="fill_parent"
android:layout_height="wrap_content"
android:orientation="vertical"
>

<RadioButton android:id="@+id/red"
android:layout_width="fill_parent"
android:layout_height="wrap_content"
android:text="Red"
/>
<RadioButton android:id="@+id/blue"
android:layout_width="fill_parent"
android:layout_height="wrap_content"
android:text="Blue"
/>
<RadioButton android:id="@+id/green"
android:layout_width="fill_parent"
android:layout_height="wrap_content"
android:text="Green"
/>

</RadioGroup>
</LinearLayout>

 
Then, update BasicViewsPractice.java by adding the following codes:
package com.app.techie;

import android.app.Activity;
import android.os.Bundle;
import android.widget.RadioButton;
import android.widget.RadioGroup;
import android.widget.Toast;
import android.widget.RadioGroup.OnCheckedChangeListener;

public class BasicViewsPractice extends Activity {
    /** Called when the activity is first created. */
    @Override
    public void onCreate(Bundle savedInstanceState) {
        super.onCreate(savedInstanceState);
        setContentView(R.layout.basicviewspart2);
       
        RadioGroup colorChoices = (RadioGroup) findViewById(R.id.colorOptions);
        colorChoices.setOnCheckedChangeListener(new OnCheckedChangeListener() {
           
            @Override
            public void onCheckedChanged(RadioGroup group, int checkedId) {
                RadioButton redOption = (RadioButton) findViewById(R.id.red);
                RadioButton blueOption = (RadioButton) findViewById(R.id.blue);
                RadioButton greenOption = (RadioButton) findViewById(R.id.green);
               
                if(redOption.getId()==checkedId){
                    displayToast("You selected red!");
                }
               
                if(blueOption.getId()==checkedId){
                    displayToast("You selected blue!");
                }
               
                if(greenOption.getId()==checkedId){
                    displayToast("You selected green!");
                }
            }
        });
       
    }

    private void displayToast(String message){
        Toast.makeText(getBaseContext(), message, Toast.LENGTH_SHORT).show();
    }
}

Briefly, the code above simply display a message through Toast. the message indicates what option a user selects. We identified the radiobutton selected using its IDs. The above should look like:

ProgressBar
This view is usually used to indicate that an event, task or an activity is currently ongoing. An example of which is downloading files where progress of download is shown visually though a color bar. This is a good choice to tell the user about the status of the task. For us to understand it better, lets do the activity below.

Lets use same activity created above and update the basicviewspart2.xml by adding the following code:
<ProgressBar
android:id="@+id/normalProgressBar"
android:layout_width="wrap_content"
android:layout_height="wrap_content"
android:visibility="gone"
/>
<Button android:id="@+id/btnDownload"
android:layout_width="wrap_content"
android:layout_height="wrap_content"
android:text="Download"
/>

On our xml code, we added two views. A progress bar with visibility default to gone so at startup it does not appear on display and a button to do some work or task on background. What we want to do is to simulate progress bar. So, if the user clicks the button, a task is started and the progress bar will display and hide when the task is done.

Update BasicActivityPractice.java to look like this:
package com.app.techie;

import android.app.Activity;
import android.os.Bundle;
import android.os.Handler;
import android.view.View;
import android.widget.Button;
import android.widget.ProgressBar;
import android.widget.RadioButton;
import android.widget.RadioGroup;
import android.widget.Toast;
import android.widget.RadioGroup.OnCheckedChangeListener;

public class BasicViewsPractice extends Activity {
    private static int progress = 0;
    private ProgressBar normalProgressBar;
    private int progressStatus = 0;
    private Handler handler = new Handler();

   
    /** Called when the activity is first created. */
    @Override
    public void onCreate(Bundle savedInstanceState) {
        super.onCreate(savedInstanceState);
        setContentView(R.layout.basicviewspart2);
       
        RadioGroup colorChoices = (RadioGroup) findViewById(R.id.colorOptions);
        colorChoices.setOnCheckedChangeListener(new OnCheckedChangeListener() {
           
            @Override
            public void onCheckedChanged(RadioGroup group, int checkedId) {
                RadioButton redOption = (RadioButton) findViewById(R.id.red);
                RadioButton blueOption = (RadioButton) findViewById(R.id.blue);
                RadioButton greenOption = (RadioButton) findViewById(R.id.green);
               
                if(redOption.getId()==checkedId){
                    displayToast("You selected red!");
                }
               
                if(blueOption.getId()==checkedId){
                    displayToast("You selected blue!");
                }
               
                if(greenOption.getId()==checkedId){
                    displayToast("You selected green!");
                }
            }
        });
       
        normalProgressBar = (ProgressBar) findViewById(R.id.normalProgressBar);
        Button download = (Button) findViewById(R.id.btnDownload);
        download.setOnClickListener(new View.OnClickListener() {
            @Override
            public void onClick(View v) {
                //show the progress bar
                normalProgressBar.setVisibility(0);
                simulateProgress();
            }

            private void simulateProgress() {
                progress = 0;
                progressStatus = 0;
                //do some work in background thread
                new Thread(new Runnable()
                {
                    public void run()
                    {
                        //do some work here
                        while (progressStatus < 10)
                        {
                            progressStatus = doSomeWork();
                        }
                       
                        //hides the progress bar
                        handler.post(new Runnable()
                        {
                            public void run()
                            {
                                //0 - VISIBLE; 4 - INVISIBLE; 8 - GONE
                                normalProgressBar.setVisibility(8);
                            }
                        });
                    }   
                   
                    //do some long lasting work here
                    private int doSomeWork()
                    {
                        try {
                            //simulate doing some work
                            Thread.sleep(500);
                        } catch (InterruptedException e)
                        {
                            e.printStackTrace();
                        }
                        return ++progress;
                    }
                   
                }).start();
            }

           
        });
       
    }

    /**
     * Helper method to display message
     * @param message
     */
    private void displayToast(String message){
        Toast.makeText(getBaseContext(), message, Toast.LENGTH_SHORT).show();
    }
}

The above code retrieves the progress bar we added to layout earlier as well as the button. When the button is clicked, the progress bar visibility is changed to visible mode and a background task simulation took place wherein upon its done, the visibility of the progress bar is changed back to gone. By the way, there are three representations of visibility - 0 for visible, 4 for invisible, and 8 for gone. The activity should look like below.
Moreover, ProgressBar has an attribute style wherein you can change its display. Instead of intermediate mode style like above, you can use a horizontal bar. Take note of the code:
<ProgressBar
android:id="@+id/normalProgressBar"
android:layout_width="wrap_content"
android:layout_height="wrap_content"
android:visibility="gone"
style="?android:attr/progressBarStyleHorizontal"
/>

And then change your activity class code in method simulationProgress() to:
//do some work here
while (progressStatus < 100)
{
   progressStatus = doSomeWork();
                           
   //Update the progress bar
   handler.post(new Runnable()
      {
         public void run() {
           normalProgressBar.setProgress(progressStatus);
         }
      });

}

The result should be like:

AutoCompleteTextView
It is a subclass of textview only that it has an auto complete suggestion feature. Think of a textbox while typing and under it is keyword suggestions.  This basically helps you reduce the typing effort and typo error. 

What we are going to do first is update the android layout xml by adding an autocomplete textview:
<AutoCompleteTextView
android:id="@+id/txtFriends"
android:layout_width="fill_parent"
android:layout_height="wrap_content"
/>
Afterwards, we add code to our activity class inside onCreate method:
final String[] friends = {
                "Jose Rizal",
                "Britney Spears",
                "Sarah Walker",
                "Sarah Jane",
                "Brook How",
                "Kimberly Some",
                "Kimkrek Shoo"
        };
        ArrayAdapter<String> adapter = new ArrayAdapter<String>(this,android.R.layout.simple_dropdown_item_1line, friends);
       
        AutoCompleteTextView txtFriend = (AutoCompleteTextView) findViewById(R.id.txtFriends);
        txtFriend.setThreshold(3);
        txtFriend.setAdapter(adapter);

Understanding the code above: We made an array of string where its value will be the value suggested to the user. It is feed into an ArrayAdapter object where the auto complete textview can obtain suggestions. If you notice, we also set threshold to 3. Threshold is used to set the minimum characters before suggestions appear as a drop-down menu. Try running the application and it should look like:

Nutshell
Finally, we are donw with those another three kind of useful Android views. In this tutorial we've learned more basic on views. Another article is coming up taking up more views so stay tuned. Hope this article helps you.

Thursday, April 15, 2010

Check If a String Contains a Substring in Java

This article shows some useful ways on checking a string that contains a substring. I find this topic relevant to document as I may someday use this on another project. Also, other developers might look for an article online to help them solve their problem. Since this topic is very basic Java, I only added short description and sample code below. 

//Create a string to evaluate
String phrase = "The big brown fox jumped over the lazy dog!";

//Check if it contains a case sensitive substring
boolean evaluation = phrase.contains("brown"); //returns true
evaluation = phrase.contains("Brown"); //returns false
evaluation = phrase.indexOf("fox jumped") > 0; //returns true

//Check if phrase starts with a substring
evaluation = phrase.startsWith("Th"); //returns true

//Check if phrase ends with a substring
evaluation = phrase.endsWith("og"); //returns true

//To check string with ignore case, we should be using regular expression
evaluation = string.matches("(?i).*i am.*"); //returns true

//Check if phrase starts with a substring
evaluation = string.matches("(?i)th.*"); //returns true

//Check if phrase ends with a substring
evaluation = string.matches("(?i).*adam"); //returns true

That is all for this article. I hope this helps you.

Wednesday, April 14, 2010

Best Tool for Monitoring Social Media or Websites

I found a great site or tool for monitoring social media or social networking websites like Twitter, Facebook, FriendFeed, YouTube, Digg, Google etc. If you wanted to know what people are saying about you, an event, any person or anything,  I recommend you do a visit and perhaps, try out Social Mention services. 

They have a Realtime Buzz Widget which is very interesting, very useful and very easy to use or integrate on any blog platform whether it be Wordpress, Blogger or others. It is as easy as adding a JavaScript widget into your blog template. It does not require programming skills. all you need to do is to copy the html, set the search phrase and title, and put it on your site. The code below are the only code you'll need to add into your blog.


//See latest code on http://socialmention.com/tools/ page.
//***********************************************************
<script type="text/javascript">
// search phrase (replace this)
var smSearchPhrase = 'socialmention';
// title (optional)
var smTitle = 'Realtime Buzz';
// items per page
var smItemsPerPage = 7;
// show or hide user profile images
var smShowUserImages = true;
// widget font size in pixels
var smFontSize = 11;
// height of the widget
var smWidgetHeight = 500;
// sources (optional, comment out for "all")
//var smSources = ['twitter', 'googleblog', 'brightkite', 'delicious', 'friendfeed', 'flickr', 'identica', 'youare', 'digg'];
</script>
<script type="text/javascript" language="javascript" src="http://socialmention.com/widgets/buzz.js"></script>

The code will result to: 


In my opinion and as a person who likes to write, read and share articles online and loves the internet, I find this widget very helpful and useful. Thanks to Jon Cianciullo ,the person behind this project that allows us to easily track and measure what people are saying about you, your company, a new product, or any topic across the web's social media landscape in real-time. 

Saturday, April 10, 2010

Android Software Competition by Globe Telecom

I first heard this news from Calen Legaspi, our CEO at Orange and Bronze Software Labs, that Globe Labs will host and conduct its first mobile developer event for 2010. I've been hearing about Android platform since 2008 and now, Globe Labs posted an invitation for all developers to explore the new mobile platform.

The event is an Android software competition open for all Filipino developers. This is an invitation to all developers to build their mobile application on top of Android platform.
 
Big cash prizes are at stake in this competition, as well as the chance for the participating teams to pitch their product to international investors for funding. The competition will run through until July 2010. For more details on contest mechanics, dates and guidelines, please click here.

I think this event is a great opportunity for all developers. Its not just an opportunity to make money, but, an opportunity for learning how to develop an application on a new mobile platform.

To those who are interested to join this competition, visit Globe Labs website at www.globelabs.com to sign-up.

Tutorial on Android Views - Part 1

On my previous articles, we had a discussion on the android's definition and layout. I assume that you have already learn basics on manipulating android layout. In this and on the next article, we will be exploring and dealing more on the various types of commonly used views such as TextView, EditText, Button, ImageButton, CheckBox and ToggleButton. Those widgets are likely the most commonly used in developing android applications.

Lets begin by creating a new project on eclipse:

After which, create an Android XML under res/layout and name it basicviews.xml having written inside is the following code below:
<?xml version="1.0" encoding="utf-8"?>
<LinearLayout
  xmlns:android="http://schemas.android.com/apk/res/android"
  android:layout_width="fill_parent"
  android:layout_height="wrap_content"
  android:orientation="vertical"
  >
 
  <TextView
      android:text="Welcome to Android!"
      android:layout_height="wrap_content"
      android:layout_width="wrap_content"
  />
 
  <EditText
      android:id="@+id/sampleText"
      android:text=""
      android:layout_height="wrap_content"
      android:layout_width="fill_parent"
  />
 
  <Button
      android:id="@+id/popupSampleText"
      android:text="Pop up"
      android:layout_height="wrap_content"
      android:layout_width="fill_parent"
  />
</LinearLayout>


The code above contains basic views such as textview, edittext and button supplied with an id. The views id will be used later and discussed further in this discussion. We are doing this layout so we will be able to play around with those views. Below is a little description on those view types.
  • TextView - is basically an element that is used to display text on screen or to the user. It is one of the most basic views and most commonly used in developing an android application. Also, do take note that the text inside this view type is not editable.
  • EditText - is another type of view that is used for character/text input such as name or passwords.
  • Button - it represents a push-button widget which can be pushed or clicked by the user to perform an activity, an event or an action.
Going back to views, its id must always start  with "@+id/" specifier followed by a meaningful view name. So, the next step is we want to use or utilize the following views. Lets edit BasicViewsPractice.java by making its code look like below:
package com.app.techie;

import android.app.Activity;
import android.os.Bundle;
import android.view.View;
import android.widget.Button;
import android.widget.TextView;
import android.widget.Toast;

public class BasicViewsPractice extends Activity {
    /** Called when the activity is first created. */
    @Override
    public void onCreate(Bundle savedInstanceState) {
        super.onCreate(savedInstanceState);
        setContentView(R.layout.basicviews);
       
        Button popUp = (Button) findViewById(R.id.popupSampleText);
        popUp.setOnClickListener(new View.OnClickListener() {
            @Override
            public void onClick(View v) {
                TextView sampleText = (TextView) findViewById(R.id.sampleText);
               
                if(0 != sampleText.getText().toString().length()){
                    Toast.makeText(getBaseContext(), sampleText.getText().toString(), Toast.LENGTH_SHORT).show();
                }else{
                    Toast.makeText(getBaseContext(), "The textbox is empty!", Toast.LENGTH_SHORT).show();
                }
            }
        });
    }
}
In the code above, instead of using the main.xml layout, we replace it with basicviews.xml layout on setContentView(...) method to load the layout we just did a while ago. We also instantiated a button as well as a editview. Those views are linked to the corresponding element with the exact id on the xml layout. Moreover, we also added an onClickListener () to the button so whenever the user clicks on it, the text inside the edittext will display on screen through Toast. Try running the application and it should look like this:
There you go! Your application should be similar to above. If the edittext is empty, it should display "textbox is empty" as a message. Moving forward, add the code below on basicviews.xml just right after popupButton view.
<EditText
      android:id="@+id/sampleTextPassword"
      android:text="sample"
      android:password="true"
      android:layout_width="fill_parent"
      android:layout_height="wrap_content"
  />
 
  <ImageButton
      android:id="@+id/sampleImageButton"
      android:layout_width="fill_parent"
      android:layout_height="wrap_content"
      android:src="@drawable/icon"
  />

The code added two new views. The edittext character will be replaced with a dot since we set its password attribute to true. The imagebutton is similar to a normal button view. Only that image button has an attribute where you can specify an icon to display wrap inside a button.


Lets do another update by adding the following code:
<CheckBox android:id="@+id/chkSample"
    android:layout_width="fill_parent"
    android:layout_height="wrap_content"
    android:text="Checkbox Sample"
  />
 
  <CheckBox android:id="@+id/chkStarLook"
    style="?android:attr/starStyle"
    android:layout_width="wrap_content"
    android:layout_height="wrap_content"
    android:text="Star checkbox"
  />

On the code, the first checkbox will look normal with a square and the second one will appear like a star since we provided a starStyle to its attribute. A checkbox is another special type of button. It has two state and its default is unchecked, otherwise its checked. For us to be able to try out checkbox view state, lets update BasicViewsPractice.java by adding the following code below:
CheckBox chkSample = (CheckBox) findViewById(R.id.chkSample);
        chkSample.setOnClickListener(new View.OnClickListener() {
           
            @Override
            public void onClick(View v) {
                if(((CheckBox) v).isChecked()){
                    Toast.makeText(getBaseContext(), "Checked", Toast.LENGTH_SHORT).show();
                }else{
                    Toast.makeText(getBaseContext(), "Unchecked", Toast.LENGTH_SHORT).show();
                }
            }
        });


That suffice how you are going to verify a chechbox view state using java code. That same code also applies to the star checkbox. Just change the id of the checkbox on your java code. Try running the code and you should be able to see something like below.
Another view that behaves like CheckBox is the ToggleButton. It has two state, checked and unchecked, just like a CheckBox view. Only that this time, it has a light indicator to display its current state. Try it out by adding a togglebutton on basicviews.xml.
<ToggleButton android:id="@+id/tglSample"
    android:layout_width="wrap_content"
    android:layout_height="wrap_content"
    android:text="Light switch"
/>


To be able to check its current state, add the following code below on the BasicViewsPractice.java.
ToggleButton tglSample = (ToggleButton) findViewById(R.id.tglSample);
        tglSample.setOnClickListener(new View.OnClickListener() {
            @Override
            public void onClick(View v) {
                if(((ToggleButton) v).isChecked()){
                    Toast.makeText(getBaseContext(), "Light On", Toast.LENGTH_SHORT).show();
                }else{
                    Toast.makeText(getBaseContext(), "Light Off", Toast.LENGTH_SHORT).show();
                }
            }
        });


As you can see above, its more or less like the code on checking a checkbox view. Try running the code and see for yourself.


Nutshell:

In this tutorial we were able to learn and experiment on textView, edittext, button, imagebutton, checkbox and toggle button. However, there are still more views to learn and they will be discussed in detail my next article. Hope you learned from this article. Enjoy!

Friday, April 2, 2010

Webmaster Tools Tip for Blogger

During my research about webmaster tools, I found out that there are three major search engine that provides detailed information on how they see and crawl your website. However, they require account confirmation and website verification before you can access most of its features. Below are the steps on how you'll be able to take advantage of those search engine webmaster tools.

Google Webmaster Tools
  1. Log in to https://www.google.com/webmasters/tools/ with your Google account.
  2. Enter your blog URL and click Add Site.
  3. You will be presented with several verification methods. Choose Meta Tag.
  4. Copy the meta tag, which looks something like
    <meta content="dBw5CvburAxi537Rp9qi5uG2174Vb6JwHwIRwPSLIK8" name="google-site-verification"></meta>
  5. Leave the verification page open and go to your blog Dashboard > Layout > Edit HTML.
  6. Open the Blogger Dashboard and paste the code after <head> tag.
  7. Click on Save Template.
  8. Go back to the verification page and click Verify.
Yahoo Site Explorer
  1. Log in to https://siteexplorer.search.yahoo.com/ with your Yahoo account.
  2. Enter your blog URL and click Add My Site.
  3. You will be presented with several authentication methods. Choose By adding a META tag to my home page..
  4. Copy the meta tag, which looks something like
    <meta content="3236dee82aabe064" name="y_key"></meta>
  5. Leave the verification page open and go to your blog Dashboard > Layout > Edit HTML.
  6. Open the Blogger Dashboard and paste the code after <head> tag.
  7. Click on Save Changes.
  8. Go back to the verification page and click Read to Authenticate.
Bing Webmaster Center 
  1. Log in to http://www.bing.com/webmaster with your Live! account.
  2. Click Add a Site.
  3. Enter your blog URL and click Submit.
  4. Copy the meta tag from the text area at the bottom. It looks something like
    <meta name='msvalidate.01' content='12C1203B5086AECE94EB3A3D9830B2E'>
  5. Leave the verification page open and go to your blog Dashboard > Layout > Edit HTML.
  6. Open the Blogger Dashboard and paste the code after <head> tag.
  7. Click on Save Changes.
  8. Go back to the verification page and click Return to the Site List.
After doing those, hopefully you can now start monitoring your site on those three major search engines by using there respective webmaster tool. It will take time before it gets all the necessary data.

So, that ends my article. Hope you find this article helpful and if you have any suggestions feel free to leave a comment or shoot me an email.

Techie Focus List

During my day job, I work on the business and back-end layer of a J2EE Quoting Software with heavy data handling and manipulation. Even though what I'm working on is part of an enterprise web application, I feel like my abilities in developing ground up application are depreciating. I find my self in need to keep up with the latest trends of technology and to learn what is in demand. 

The scale of today's demand of software or applications seem to be in favour of  the web so I decided to focus on the web stack. I made a list below of the technologies hopefully are and will be in demand soon according to the people and forums I asked on-line.

I'm actually familiar on some of the technologies below. However, I need thorough review to prepare my mindset and gain back my skills in using the those technologies and frameworks.

Technologies:
  • Groovy and Grails
  • Python and DJango
  • C++
Java Specific:
  • Java Server Faces(JSF) / Struts
  • Spring 
  • JPA/JDO & Hibernate
  • AppEngine
  • WebService
  • JUnit & Mockery
  • Hudson
  • Ant / Ivy
  • IBM WebSphere 
  • Android
  • JBoss/Glashfish
Databases:
  • MySQL
  • Derby
  • Oracle
  • PostgreSQL
  • IBM DB2
  • SQLite
In addition, I will also be learning Linux administration for maintaining servers as well as repairs. I'm actually a linux user since college but I still feel I need to dig deeper on systems administration. Another goal also is taking the SCJP exam late this year.

I already started and feeling great to be in the road again.

Thursday, April 1, 2010

Blogger or Blogspot Title Tag Optimization Tip

I know there had been lots and lots of title tag optimization tip written online. However, I thought of sharing what best and works to me among all those I have read and researched online. I made a little bit of improvement to make search engine bot crawlers read my blog title efficiently. 

We do know that blogger is part of Google, however, blogger default templates are poorly optimized. To be able to compete woth other blogs, there are few things to do and that includes optimizing your blogger title tag.
The title tag is a critical part of optimizing your blogger or blogspot blog. Its the one that search engine look over when they crawl your blog links. For example, Google only looks at the first 80 characters of your blog's post title. So say for example on your default template title is rendered like: (green for blog title and orange for post title)
Techie Boy from CDO - Tutorial on Android Layout
The above wasted 20 characters occupied by the blog title which should instead be occupied by the post title. To fix the above, it should look like:
Tutorial on Android Layout - Techie Boy from CDO
Moreover, other search engines does not just read titles. Some read meta tags for description and keywords to locate your website. So, its important to also include and place relevant meta tags on your title.

So, lets begin:
1. Go to your Layout and Edit HTML tab. Check option Expand Widgets Templates and look for the following tag:
<title><data:blog.pagetitle/></title>

2. Optimize the title by replacing the code by:
<b:if cond='data:blog.pageType == &quot;index&quot;'>
        <h1><title><data:blog.title/></title></h1>
        <meta content='Provide description' name='Description'/>
        <meta content='Provide keywords' name='Keywords'/>
    <b:else/>
        <b:if cond='data:blog.pageType == &quot;archive&quot;'>
            <h1><title><data:blog.title/></title></h1>
            <meta content='Same description above' name='Description'/>
            <meta content='Same keywords above' name='Keywords'/>
        <b:else/>
            <b:if cond='data:blog.pageType == &quot;item&quot;'>
            <h1><title><data:blog.pageName/> ~ <data:blog.title/></title></h1>
            <meta expr:content='data:blog.pageName' name='Description'/>
            <meta expr:content='data:blog.pageName + data:blog.title +data:blog.pageTitle' name='Keywords'/>
        <b:else/>
            <h1><title><data:blog.pageTitle/></title></h1></b:if>
        </b:if>
    </b:if>

3. Save template and your done!

Nutshell:
This tip is just one way of optimizing your blog. SEO is difficult so to speak. There are calculations and many different ways. Another way of gaining visitors is making use of widgets like Share, Facebook Fan Page, Google Connect, RSS feeds, adding your page or blog on search engines and relevant blog directories, and many, many more...

Hope you find this article helpful. Good luck and have fun!
 

Author

Followers

Techie Projects

Open Source